Connecting the Black Magic Probe to a blue pill
This article is mostly just me documenting how I wired things up.
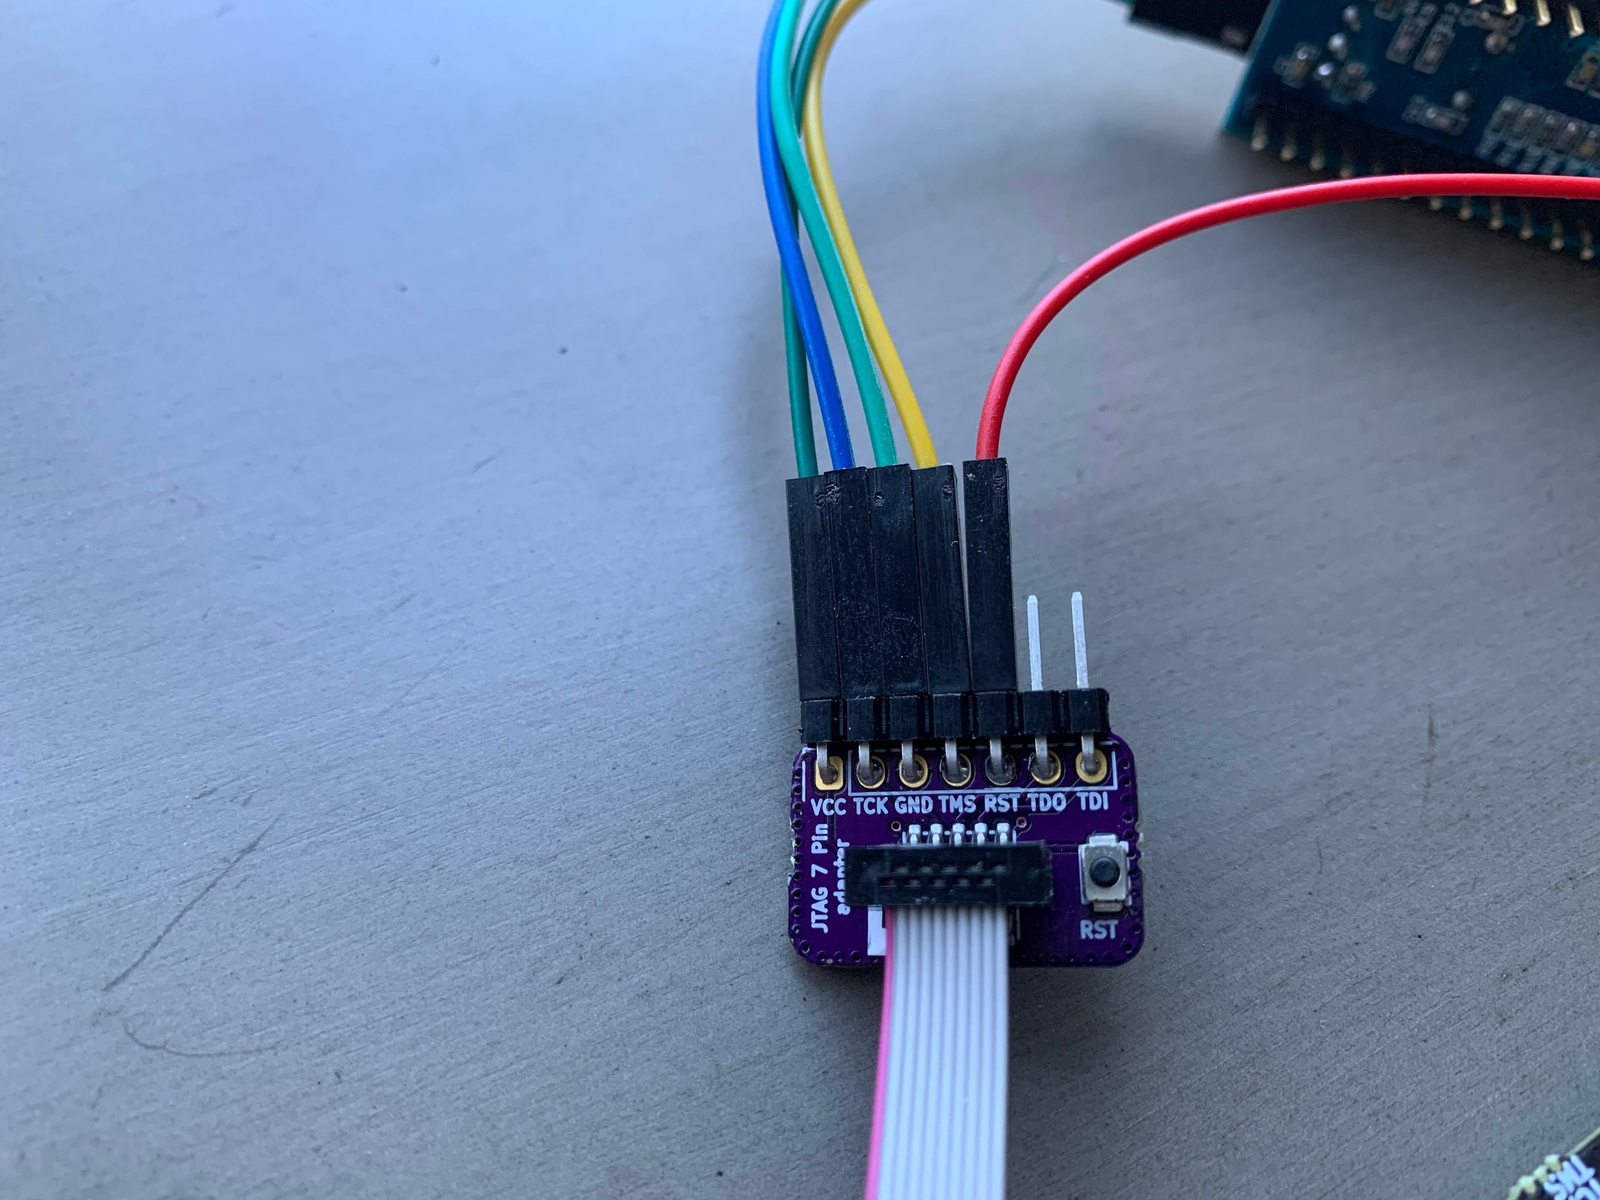
I connected a Black Magic Probe to a Blue Pill. I also needed the 7-pin adapter kit to break out the needed signals.
Wire it up
Connect things up as follows:
| 7-pin adapter | Blue Pill | Wire Color (in picture) |
|---|---|---|
| GND | GND | Light Green |
| TCK | SWCLK | Blue |
| TMS | SWDIO | Yellow |
| VCC | VCC 3.3V | Dark Green |
| RST | R (Reset) | Red |
I needed to connect up VCC in order for the Black Magic Probe to detect the correct voltage.
This photo shows the basic wiring. The 4 wires that aren’t connected at the BMP serial port which are optional.
Closeup of the 7-pin adapter.
Closeup of the SWD connector
GDB commands
Create a command file with the following contents:
monitor connect_srst enable
monitor swdp_scan
attach 1
load
compare-sections
kill
The kill causes the processor to be reset and start to run your program.
Run gdb as follows:
arm-none-eabi-gdb -ex 'target extended-remote /dev/cu.usbmodem7ABA4DC11' --batch -command blinky.elf
NOTE: On MacOS using /dev/tty.usbmodem7ABA4DC11 may hang the 2nd time you run gdb, where if you use /dev/cu.usbmodem7ABA4DC11 it seems to open successfully every time.
The --batch option tells gdb to exit after executing the command file.
Your GDB session should look something like:
$ arm-none-eabi-gdb -ex 'target extended-remote /dev/cu.usbmodem7ABA4DC11' --batch --command gdbinit-swd blinky.elf
Target voltage: 3.3V
Available Targets:
No. Att Driver
 1      STM32F1 medium density
0x080029b8 in Reset_Handler ()
Loading section .isr_vector, size 0x10c lma 0x8000000
Loading section .text, size 0x28f4 lma 0x800010c
Loading section .rodata, size 0x28 lma 0x8002a00
Loading section .data, size 0x4 lma 0x8002a28
Start address 0x80029b8, load size 10796
Transfer rate: 11 KB/sec, 771 bytes/write.
Section .isr_vector, range 0x8000000 -- 0x800010c: matched.
Section .text, range 0x800010c -- 0x8002a00: matched.
Section .rodata, range 0x8002a00 -- 0x8002a28: matched.
Section .data, range 0x8002a28 -- 0x8002a2c: matched.
Kill the program being debugged? (y or n) [answered Y; input not from terminal]
[Inferior 1 (Remote target) killed]
If you get an error aboout Error erasing flash with vFlashErase packet then your board may have some options bytes
set to make the flash readonly. You can use the GDB command monitor option erase to erase the flash and the option
bytes.
$ arm-none-eabi-gdb -ex 'target extended-remote /dev/cu.usbmodem7ABA4DC11'
GNU gdb (GNU Tools for Arm Embedded Processors 9-2019-q4-major) 8.3.0.20190709-git
Copyright (C) 2019 Free Software Foundation, Inc.
License GPLv3+: GNU GPL version 3 or later <http://gnu.org/licenses/gpl.html>
This is free software: you are free to change and redistribute it.
There is NO WARRANTY, to the extent permitted by law.
Type "show copying" and "show warranty" for details.
This GDB was configured as "--host=x86_64-apple-darwin10 --target=arm-none-eabi".
Type "show configuration" for configuration details.
For bug reporting instructions, please see:
<http://www.gnu.org/software/gdb/bugs/>.
Find the GDB manual and other documentation resources online at:
    <http://www.gnu.org/software/gdb/documentation/>.

For help, type "help".
Type "apropos word" to search for commands related to "word".
Remote debugging using /dev/cu.usbmodem7ABA4DC11
(gdb) monitor swdp_scan
Target voltage: 3.3V
Available Targets:
No. Att Driver
 1      STM32F1 medium density
(gdb) attach 1
Attaching to Remote target
warning: No executable has been specified and target does not support
determining executable automatically.  Try using the "file" command.
0x0800052c in ?? ()
(gdb) monitor option erase
0x1FFFF800: 0x5AA5
0x1FFFF802: 0xFFFF
0x1FFFF804: 0xFFFF
0x1FFFF806: 0xFFFF
0x1FFFF808: 0xFFFF
0x1FFFF80A: 0xFFFF
0x1FFFF80C: 0xFFFF
0x1FFFF80E: 0xFFFF
(gdb) quit
A debugging session is active.

	Inferior 1 [Remote target] will be detached.

Quit anyway? (y or n) y
Detaching from program: , Remote target
[Inferior 1 (Remote target) detached]


